


This is a brand spankin’ new topic for me here at this blog.
Whenever I start teaching something, there’s a struggle to figure out what I’m gonna share first. Should I cover how to install Stable Diffusion? Which toolkit I use? What hardware I use? How I pick a sampler? How to make bigger images in a certain aspect ratio? I can’t cover everything in one post, and even just laying out a table of contents is an impressive amount of work.
So here’s the deal, dear reader: when inspiration strikes me, I’m going to share things about Stable Diffusion that may be out of order. Later on, if I end up writing a lot – and there really is a lot to share here, depending on how advanced you wanna get – I’ll circle back and build a good Table of Contents. But for now, I’m just going to write things as the inspiration strikes.
I want a photo of a man holding a laptop, standing in a coffee shop.
Should be easy enough. I’m using Automatic1111’s Stable Diffusion webui, so I put “photo of a man holding a laptop, standing in a coffee shop” into the Prompt box. I’ve also tweaked a few settings – more on that later in the series.
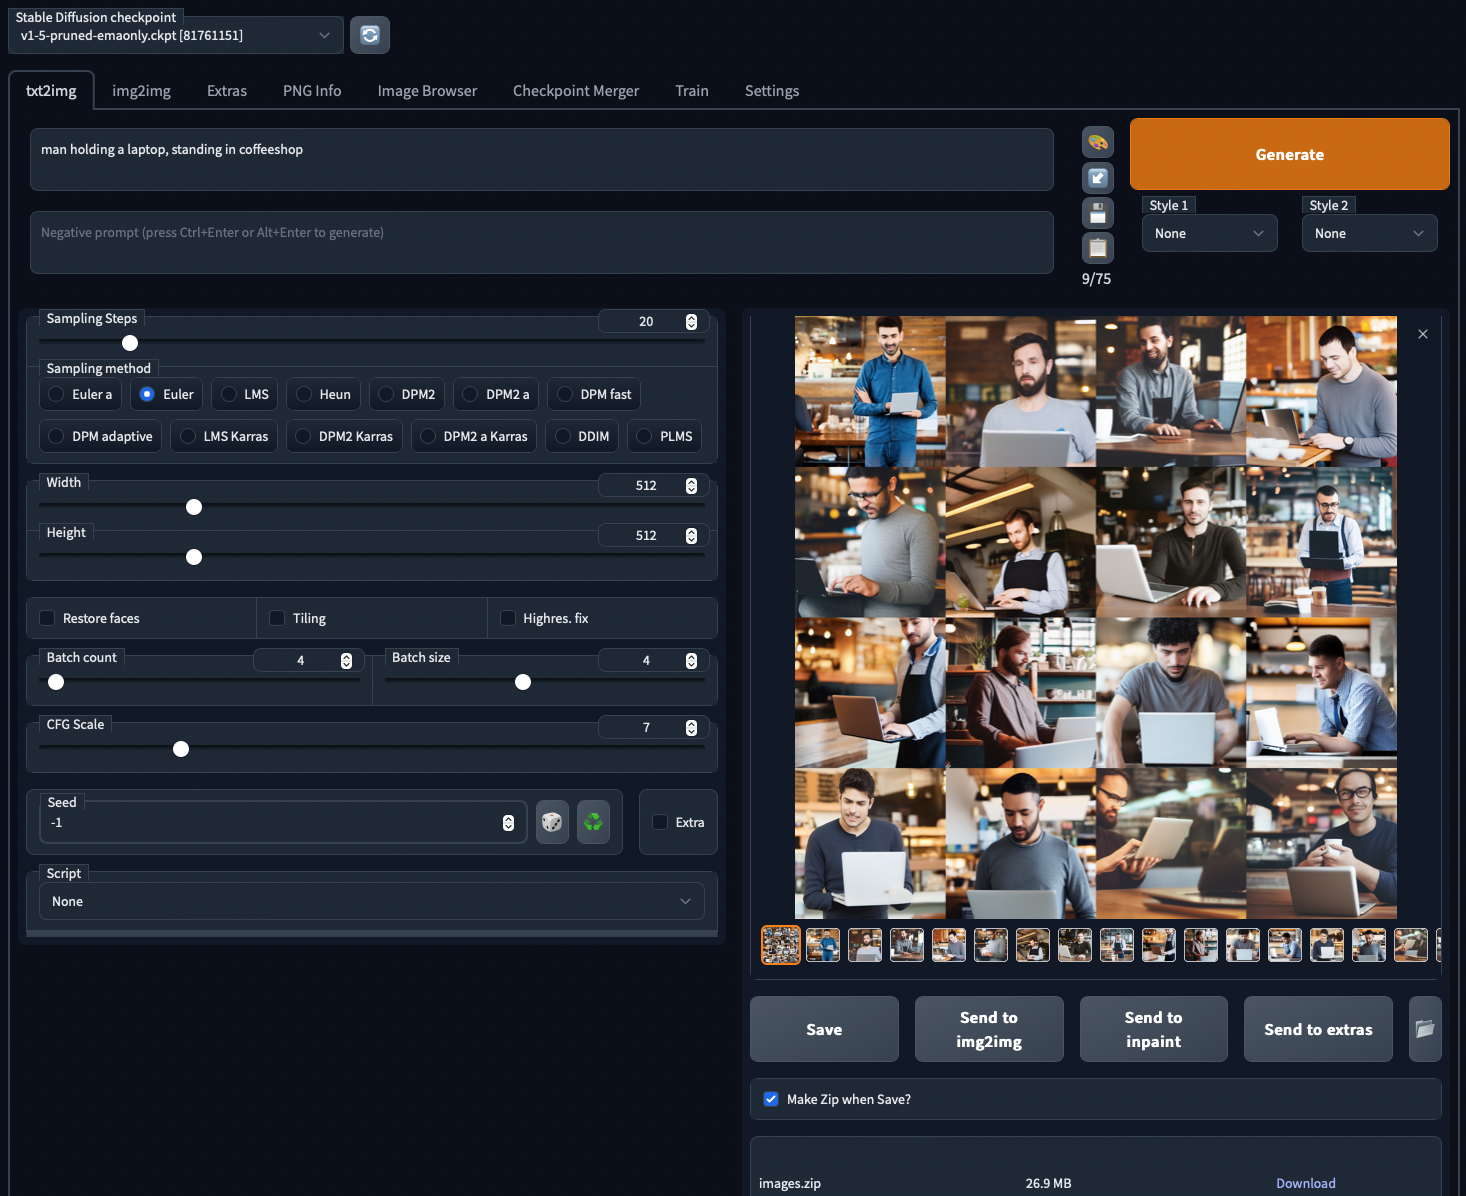
I click Generate, and 60 seconds later, I’ve got 16 photos to choose from. Free. Boom. Done.

The images aren’t perfect – to be honest, in many cases, the man isn’t actually holding the laptop. Why isn’t it exactly what we wanted, the first time? To understand what’s happening, I’ll use an analogy.
Let’s look at clouds together.


Let’s all go outside, lay down on the grass, and look up at the clouds.
I’m going to point at a cloud and ask everybody, “That cloud right there, that specific one, does that look like a man to you?”
Some clouds are obvious: we’re all going to say, “Oh yeah, that’s his head,” or perhaps we’ll say, “That cloud is a stick figure of a man.”
Other clouds are not quite as obvious. Some of us might say, “That’s a guy holding his arms out,” while someone else says, “No no, that’s just his face, and he has really big ears.”
The three components of what just happened:
- Cloud: one specific thing we’re all looking at together
- People: different people see different things in the same cloud
- Prompt: “a fruit”, the thing we’re trying to see in the cloud
That’s exactly how AI art generation works.
Our components:
- Cloud = seed number. When we generate art with Stable Diffusion, you usually start with a random seed number, which is like pointing at a random cloud in the sky. You can also repeatedly use the same exact seed number, which is exactly like pointing at the same cloud in the sky over and over. (The sky will change over time – and that’s caused by you updating your software, like PyTorch.)
- Person looking = sampling method, like Euler, Heun, LMS, and so forth. For some clouds, all of the sampling methods produce roughly the same end point, but for many clouds, the interpretations are different.
- Man = prompt. What we’re looking for in the final image.
If I ask you if it looks like a man, odds are, you can turn any cloud into a man in some way, shape, or form. Maybe it’s just his head, or his torso, or a stick figure.
The word “man” is really generic, and leaves a lot open to interpretation.
However, the more specific my prompt becomes, like “photo of a man holding a laptop, standing in a coffee shop”, then the people (sampling methods) are going to have to stare longer and get more creative to turn that cloud into it – and often, they won’t be able to do it, because the cloud’s general shape just doesn’t match what you’re looking for. That’s why we often generate lots of images based on lots of random seeds – we’re asking the AI to look at different clouds.
Generating specific art with AI requires a little work.
If I specifically want a man holding a laptop – and for this blog post, let’s say that’s important to me – then I have a few different options. We need to go back to that list of images that we built, and pick the closest match. That first one was a good start:


But there are a few problems with it:
- There’s an extra hand in there
- I’m not a big fan of denim shirts over blue jeans
- His face seems kinda weird
In order to make that image better, I have four common options:
- I could ask different people (sampling methods) to look at the same cloud (seed), and they’ll produce slightly different images
- I could ask the AI generate additional variations based on ever so slightly different clouds (seeds)
- I could change my prompt a little, like excluding extra hands, specifying the kinds of clothes I want him to wear, and ask for a handsome man – this technique is known as “prompt engineering” or “prompt whispering”
- I could do my own post-processing, like with Photoshop
All of these are valid results, but just to pick one and show how it works, I’m going to take this same cloud (seed number), and have different people look at it to tell me what they see.
Let’s get variations by asking different people to look at the same cloud.
In Automatic1111, I’m going to click on that image I liked, and below it, the image’s details are shown:
man holding a laptop, standing in coffeeshop
Steps: 20, Sampler: Euler, CFG scale: 7, Seed: 2020086530, Size: 512×512, Model hash: 81761151, Batch size: 4, Batch pos: 0
The seed number is the random cloud that the AI looked at. I’ll copy that seed number, and paste it into the Seed box in the UI, replacing -1, which picked a random seed each time. Now, I want to have several different people (sampling methods) look at that same cloud. Here is the relevant part of Automatic1111’s interface:


Sampling steps = how long we’ll spend squinting at the cloud, trying to come up with an image that matches the prompt.
Sampling method = the person looking at the cloud. Each algorithm starts with the same static image (driven by the seed number), but has a different way of interpreting what it sees.
Now, I could try different methods and steps individually, but further down the UI, Automatic1111 offers a better way: X/Y plots.


This tells Automatic1111 to generate different combinations of images in a grid – and obviously, you’re gonna wanna click on this to see the full details:
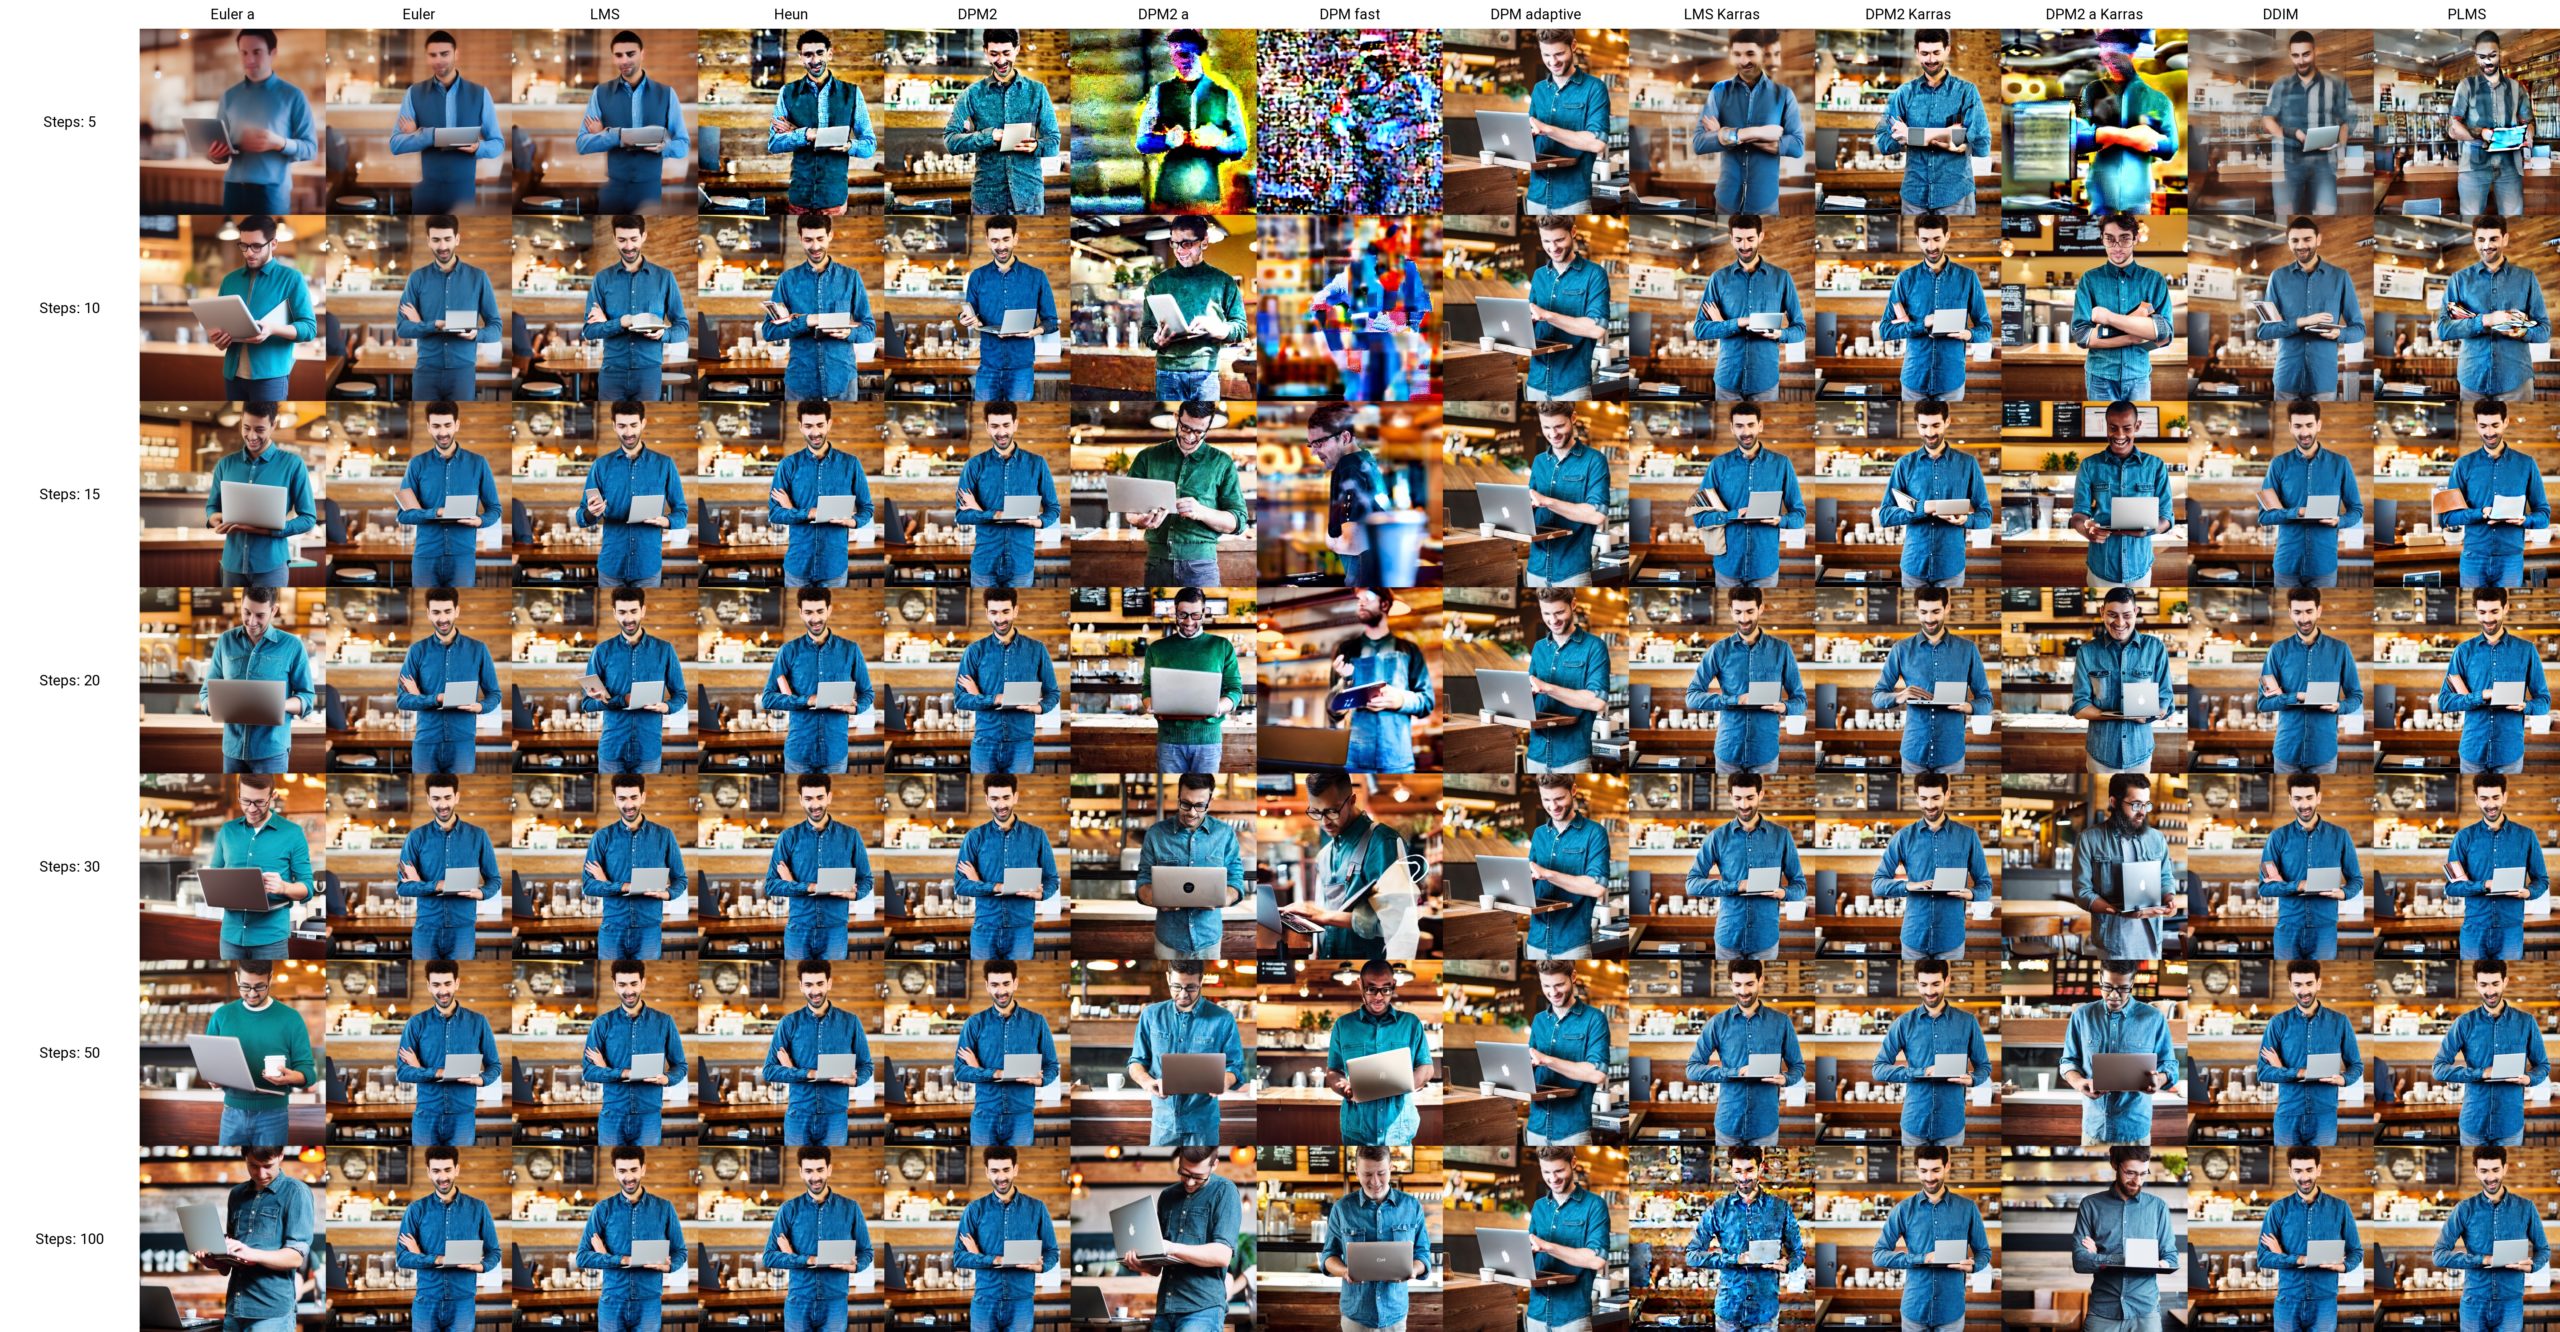
Each column is a different person looking at the cloud. Overall, most of the sampling methods come up with roughly the same kind of image – just like if you ask several people to look at the same cloud and come up with a specific prompted image, they’re going to see roughly the same subject arrangement, but the devil is in the details.
Each row is a longer period of time that the person spent looking – from 5 steps to 100 steps. More steps usually mean better image quality, but they also mean longer processing time. As you look at a single column, and look at whether images got better with more processing time, you’ll find that each sampling method has a different “good enough” area where it doesn’t make sense to keep doing more processing time.
DPM Fast and DPM2 a Karras are exceptions. Those sampling methods introduce new noise in each processing step, so their images keep changing with each different number of steps. That’s useful if you like the overall idea, but you want fresh inspiration with each step.
In a perfect world, I’d find the sampling method that produced the best quality results in the least steps, so I could produce images quickly. For me, that’s usually Euler – it produces good-enough images in just 10-20 steps – good enough that I know whether I want to bother digging more deeply in that seed or not.
In the real world, I often just shove a seed number into a config like the above one, let it crank away for a while, and then pick the best image out of the batch.
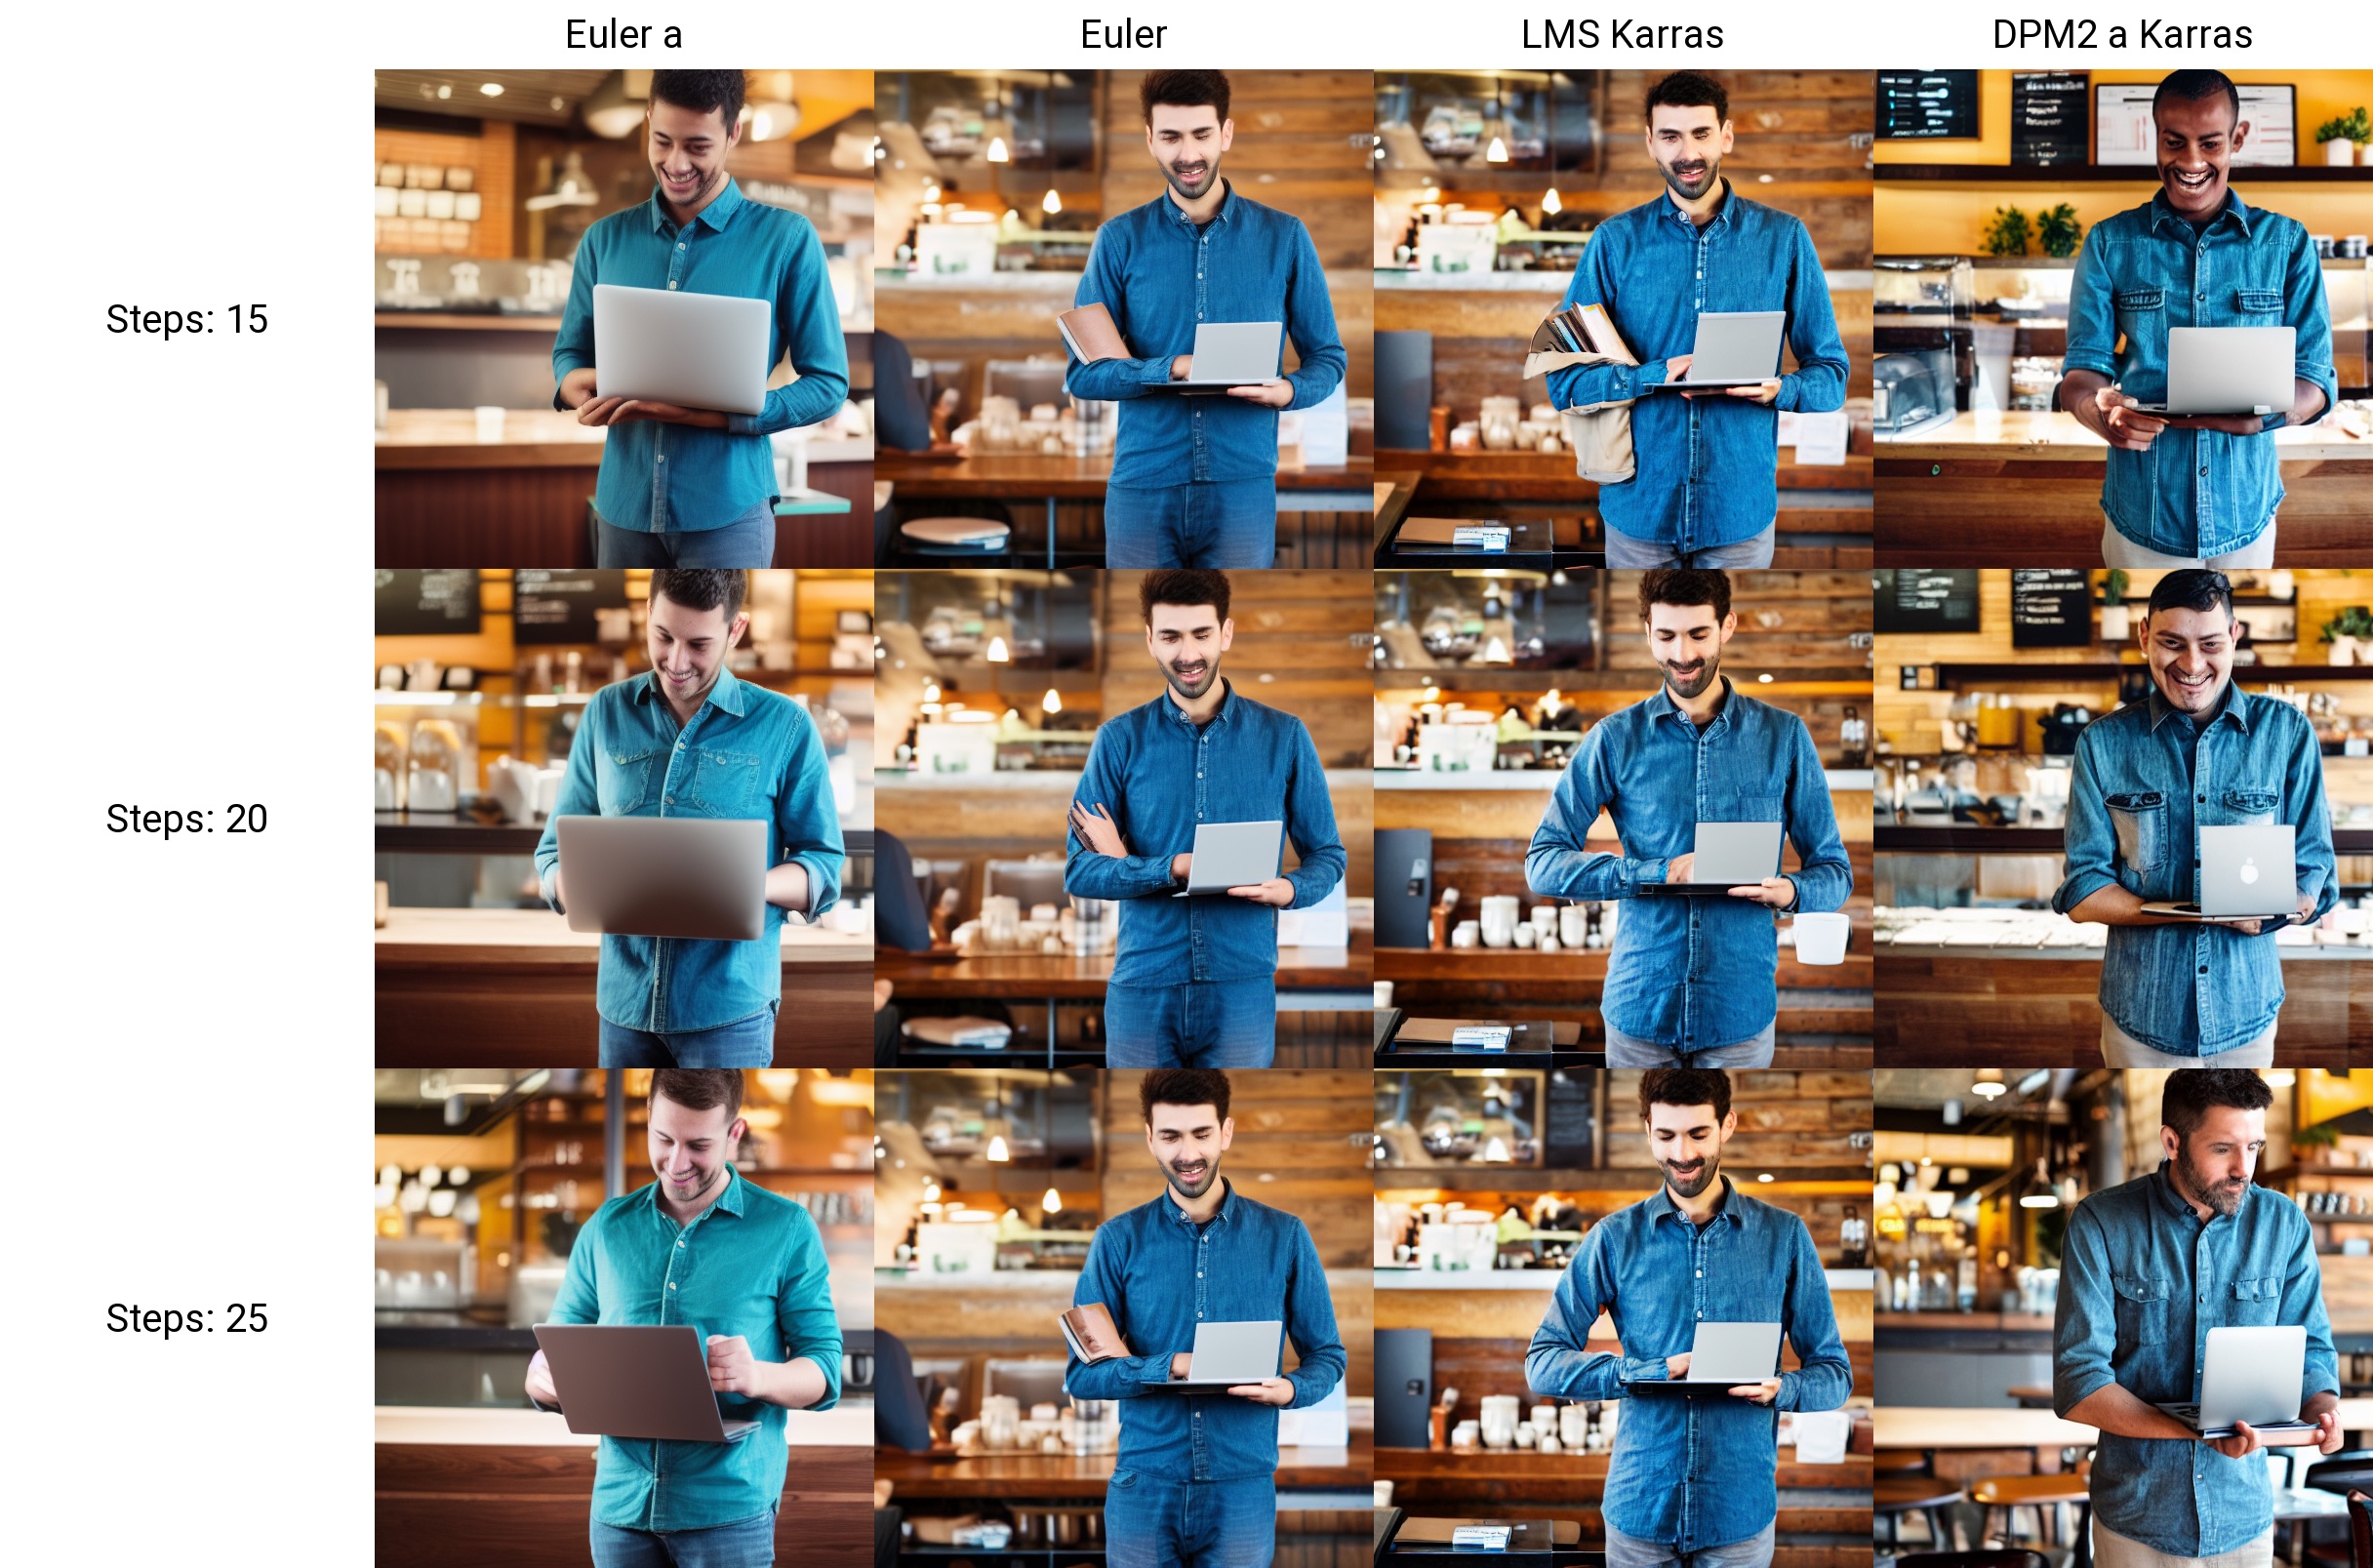
However, a lot of those samplers produce pretty redundant results. Let’s pare it down to a simpler, faster test with less options:
- Sampling methods: just my 4 favorites: Euler a, Euler, LMS Karras, and DPM2 a Karras
- Sampling steps: 15, 20, 25
That’s just 12 images (4×3), and my older gaming laptop with an NVidia 3060 can generate that grid in about 60 seconds:
So my workflow looks something like this:
- Put in a prompt for an image I want, using these settings for fast image generation: Euler, 20 steps, CFG Scale 7, 4 batches, 4 images per batch. Click Generate, and I get 16 candidate images back in about 60 seconds.
- If I don’t see any images that are good enough, go back to step 1 and refine my prompt.
- If I see an image that’s a perfect fit, we’re done here.
- If I see a candidate image that’s close but no cigar, run it through an X/Y plot with my 4 favorite sampling methods and 15-20-25 steps. I get 12 refined versions of the image I liked.
- If I see an image that’s a perfect fit, we’re done here.
- If I see a candidate image that’s close but no cigar, I have one last trick: variations.
Let’s get variations of an image by looking at similar clouds.
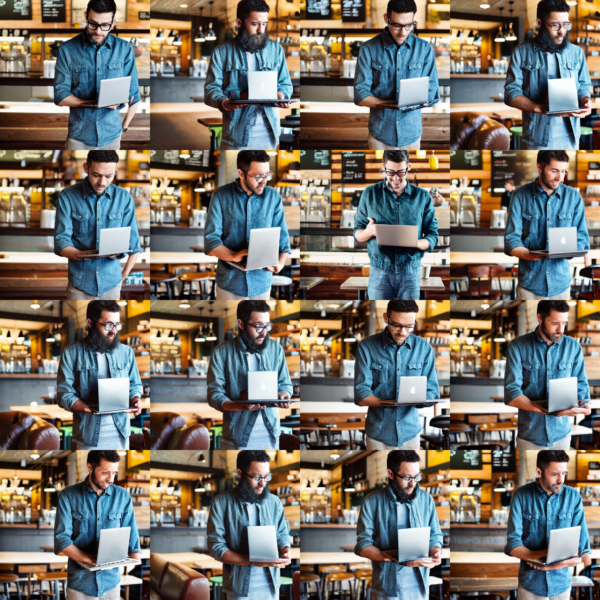
Let’s say that in that last pass of 12 images, I really liked this one, DPM2 a Karras with 25 steps:

I like that his shirt doesn’t exactly match the same denim as his pants, he’s holding the laptop, there’s not something weird under his arm, and his face is normal. (That’s surprisingly hard to get with AI). His hands and arms are just a little weird, but we’re really close.
I’ll change Automatic1111’s settings by turning off the X/Y plot (set the Script dropdown to None), and then:
- Set the Sampling Steps & Sampling Method to match whatever picture style I liked the most – in this case, 25 steps with DPM2 a Karras
- Set batch count & batch size to 4 & 4 (to generate 16 images quickly – not all video cards support batches of 4, more on that another day)
- Click the Extra checkbox next to Seed, and the Variations part shows up:


I’m going to change Variation Strength to 0.05, meaning change the image just the tiniest little bit with each pass. This means, change the original cloud that we’re looking at by just a little each time – randomize the original starting noise, and that’ll also randomize the end result just a little. Because DPM2 a Karras isn’t the fastest sampling method, building these 14 variations takes about 4 minutes:
I’ll be honest, dear reader: none of these images are perfect. I’m probably going to want to tweak the prompt a little in order to encourage the AI to build more accurate hands – but that’s a story for another blog post. You get the general idea.
Sure, that photo is boring.
But you can get anything you want – as long as you’re willing to put in the work to:
- Hone the prompt over time
- Generate a lot of starting point images by looking at a lot of clouds (seed numbers)
- Try asking different people (sampling methods) to look at the clouds
- When you find something close, run a few more variations of it to find one that’s just chefs_kiss.gif
For inspiration, hit Lexica.art and start bookmarking styles of art you like. You can pick a style that’s all you – it doesn’t have to be boring stock photos like the above ones. Maybe you want your presentations to revolve around evil rabbits or isometric art or wolf detectives or cartoon pirates. Your presentations can be as beautiful and quirky as you like.
Here’s how to get started.
I really do wish I could teach you everything inside a single blog post. Automatic1111’s tooling is way too hard for most folks to pick up as their first tool. Here are the tools I recommend folks try, in order:
- Windows: NMKD Stable Diffusion GUI – a simple all-in-one download with everything you need – as long as you’ve got an NVidia GPU with at least 4GB memory on it. (Not 4GB in your computer, mind you, but 4GB on the card itself.)
- Apple Silicon: DiffusionBee – like the above, a simple all-in-one download.
- Web page, any platform: Automatic1111 – and yes, the instructions say it’s an automatic installation, but trust me, it’s not as easy as the above two. Start with those first.
- Command line, any platform: InvokeAI – if you want to generate images at the command line or via an API, this is really powerful.
Resources for learning more:
- Discord – an independent one that seems to be more helpful than the official one
- News feed of industry updates
- /r/StableDiffusion – noisy, with a lot of “look what I made”
- Huge compilation of tools & techniques
Things are changing furiously quickly in this space, with tons of new tools and techniques popping up constantly. Prompt engineering – figuring out how to write the right prompts to get the images you want, quickly – is an amazing new field.